Composting is one of the most effective ways to reduce household waste while enriching your garden soil naturally. If you are looking for a way to turn food scraps into nutrient-rich compost, worm bins are an excellent solution. Worm bins, also known as vermicomposters, allow worms to break down organic matter efficiently, producing worm castings that are incredibly beneficial for plants. The best part? You don’t need a big yard or expensive equipment. With some creativity and a few materials, you can build your own DIY worm bin at home. In this guide, we’ll explore ten unique DIY worm bin ideas that you can try.
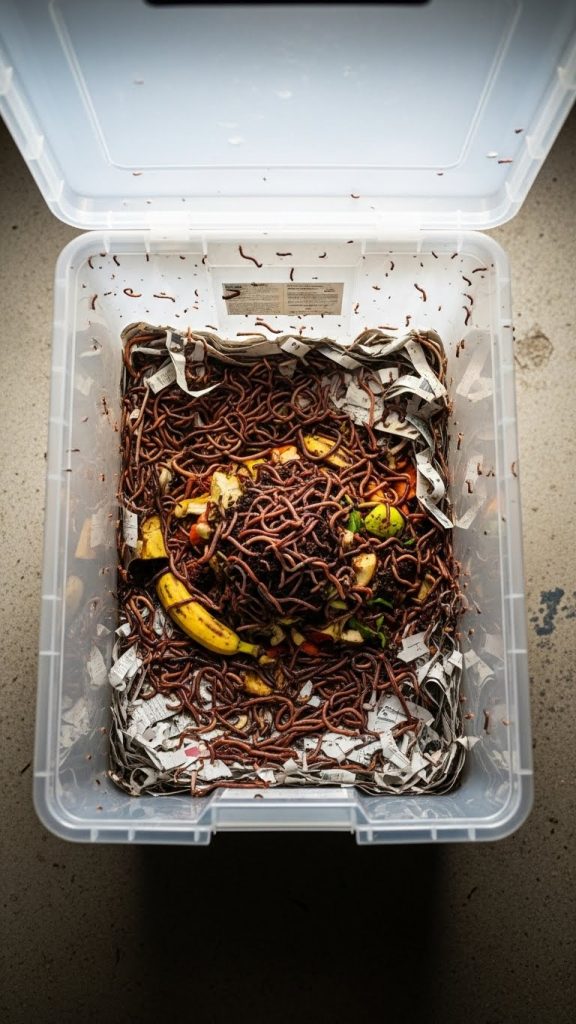
1. Classic Plastic Storage Worm Bin
The simplest and most common DIY worm bin uses a large plastic storage container. These bins are affordable, easy to find, and durable.
Materials Needed:
- A plastic storage container with a lid
- Drill or a sharp tool for making ventilation holes
- Shredded newspaper or cardboard for bedding
- Red wiggler worms (Eisenia fetida)
Instructions:
- Drill several small holes in the lid and sides of the container for airflow.
- Place shredded newspaper or cardboard at the bottom as bedding for the worms.
- Add a small amount of food scraps, like fruit and vegetable peels.
- Introduce the worms to the bin and close the lid.
- Store the bin in a cool, dark place and maintain moisture by occasionally spraying water.
Plastic storage bins are ideal for beginners because they are low-cost, lightweight, and easy to manage. They also allow for easy harvesting of worm castings by separating the worms from the compost.
2. Stackable Tray Worm Bin
For gardeners with limited space, a stackable tray system is perfect. This method uses multiple shallow trays stacked on top of each other, allowing worms to migrate upward to fresh food.
Materials Needed:
- Several shallow trays or containers
- Tray lid or cover
- Bedding material (shredded paper, leaves, or coconut coir)
- Worms
Instructions:
- Drill drainage holes at the bottom of each tray.
- Place bedding and food scraps in the bottom tray.
- Add worms and cover with a lid.
- When the bottom tray is full of compost, place a new tray on top with fresh bedding and food. Worms will naturally migrate upward.
This setup is efficient for continuous composting. Harvesting is easier, and you can keep multiple batches in different trays, making it a clean and organized solution.

3. Upcycled Wooden Crate Worm Bin
If you enjoy rustic, DIY projects, an old wooden crate can be repurposed into a worm bin. Wood is breathable, allowing for natural airflow.
Materials Needed:
- Wooden crate or box
- Sandpaper
- Drill for ventilation holes
- Bedding and worms
Instructions:
- Sand the crate to avoid splinters.
- Drill small holes on the sides and bottom for airflow and drainage.
- Line the bottom with newspaper or cardboard.
- Add food scraps and worms.
Wooden crates give a natural look and can fit well in a backyard or garage. They are durable and allow excess moisture to drain, preventing unpleasant odors.

4. DIY Worm Tower
For urban gardeners or those with limited outdoor space, a vertical worm tower can be an excellent option. This design uses a tall cylinder, allowing worms to process food scraps in a compact area.
Materials Needed:
- A tall plastic or metal cylinder
- Drill for ventilation
- Bedding and worms
Instructions:
- Drill ventilation holes along the sides.
- Layer bedding and food scraps in the cylinder.
- Add worms and cover with a breathable lid.
The vertical design saves space and works well on patios or balconies. Regularly rotate food scraps to the top so worms can gradually move upward, processing everything efficiently.

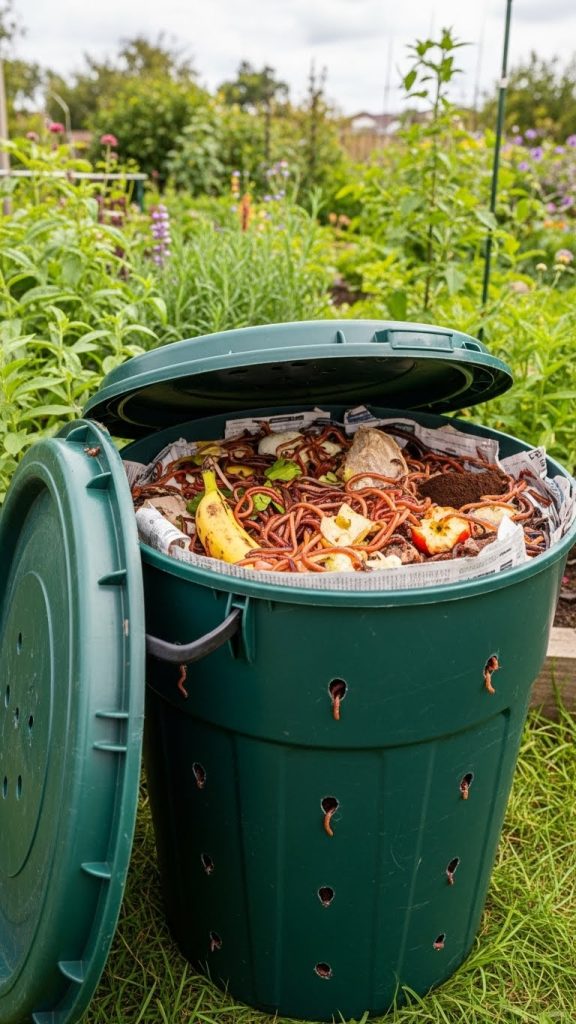
5. DIY Worm Bin from a Trash Can
Transforming a large trash can into a worm bin is ideal for gardeners with lots of organic waste. This bin can hold a large volume of food scraps and bedding.
Materials Needed:
- 30-50 gallon trash can with lid
- Drill or hammer for holes
- Bedding and worms
Instructions:
- Drill small holes for ventilation on the sides and top.
- Line the bottom with bedding material.
- Add food scraps and worms.
Trash can worm bins are great for high-volume composting. They are especially suitable for families or community gardens where more organic waste is generated daily.
6. Worm Bin in a Cooler
An old cooler can be an excellent insulator for worms, keeping temperatures steady in extreme climates. It’s compact and can be kept indoors or in a shaded area.
Materials Needed:
- Old cooler
- Drill for holes
- Bedding and worms
Instructions:
- Drill holes in the lid and sides for airflow.
- Add bedding material.
- Place food scraps and worms inside.
- Keep the cooler in a cool location and monitor moisture levels.
The cooler’s insulation helps maintain an ideal temperature, preventing the worms from overheating or freezing. This is a clever indoor-friendly worm bin.

7. Worm Bin from a Drawer
Repurpose an old dresser drawer to create a charming indoor worm bin. This method is perfect if you have limited space and want an aesthetically pleasing solution.
Materials Needed:
- Old wooden drawer
- Drill for ventilation holes
- Bedding and worms
Instructions:
- Drill small holes in the sides and bottom for airflow and drainage.
- Add bedding and worms.
- Layer food scraps on top and cover with newspaper.
Drawer worm bins are functional and stylish, blending seamlessly into your home décor. They also allow easy access to harvest worm castings without disturbing the worms too much.

8. Hanging Worm Bin
A hanging worm bin is ideal for apartments or small patios. This creative solution uses a hanging planter or basket, allowing composting without taking up floor space.
Materials Needed:
- Hanging planter with drainage holes
- Coconut coir or shredded paper bedding
- Worms
Instructions:
- Ensure the planter has adequate drainage.
- Add bedding and worms.
- Layer food scraps and hang in a shaded area.
This method is excellent for small-space gardening. It keeps compost off the ground, reducing the risk of pests while still producing high-quality compost.

9. Worm Bin with Water Collection
Some DIY worm bins are designed with a liquid collection system to capture worm tea, a nutrient-rich liquid fertilizer. This adds another layer of functionality to your composting system.
Materials Needed:
- Plastic container with spigot or hole at the bottom
- Bedding and worms
- Food scraps
Instructions:
- Drill holes for airflow and a small spigot at the bottom for liquid collection.
- Add bedding and food scraps.
- Harvest liquid fertilizer every few weeks.
Worm tea is a powerful natural fertilizer that can be used to water plants. This system makes your worm bin multifunctional, providing both solid compost and liquid fertilizer.

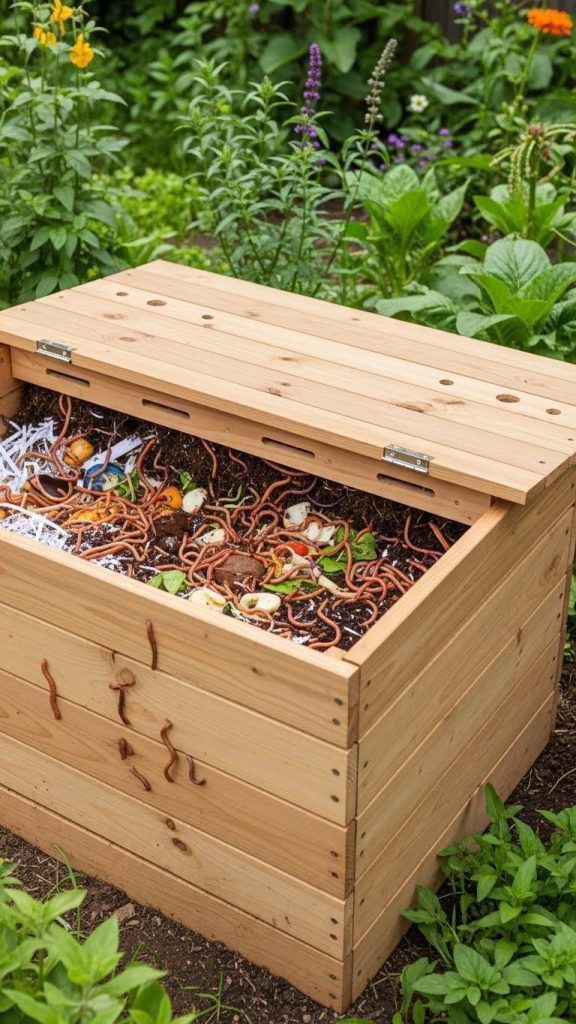
10. DIY Outdoor Worm Bin with Lid
For those with backyard space, a large outdoor worm bin is an ideal option. You can construct it from wood or repurpose old furniture. This system can handle large amounts of food waste efficiently.
Materials Needed:
- Wooden box or large container
- Drill for ventilation holes
- Bedding and worms
Instructions:
- Drill ventilation and drainage holes on the sides and bottom.
- Place bedding and worms inside.
- Add food scraps in layers.
- Cover with a lid to protect worms from extreme weather and pests.
Outdoor worm bins are perfect for garden enthusiasts with a lot of kitchen waste. They require a bit more maintenance but can produce significant amounts of compost throughout the year.
Tips for Successful DIY Worm Bins
Regardless of which DIY worm bin you choose, there are a few universal tips to ensure success:
- Temperature: Keep your worm bin in a cool, shaded area between 55-77°F. Extreme heat or cold can harm worms.
- Moisture: Bedding should be damp like a wrung-out sponge, not soggy. Spray water if it gets too dry.
- Feeding: Feed worms small amounts of food scraps regularly. Avoid meat, dairy, and oily foods.
- Aeration: Turn bedding occasionally to prevent compacting and encourage oxygen flow.
- Harvesting: Harvest worm castings every few months by separating worms from compost using the migration method or hand sorting.
Conclusion
Creating a DIY worm bin is a rewarding project that benefits both your garden and the environment. Whether you choose a simple plastic bin, a vertical tower, or a stylish indoor drawer system, the key is to maintain proper bedding, moisture, and temperature for your worms. Worm bins are versatile, sustainable, and surprisingly easy to set up.
By experimenting with these ten DIY worm bin ideas, you can find the system that fits your lifestyle and space. Not only will you reduce household waste, but you will also produce rich compost and worm tea that can transform your garden into a thriving, eco-friendly oasis. Start small, stay consistent, and enjoy the process of turning food scraps into gold for your plants.
Author
admin@weltpromi.de
Related Posts

10 Luxury Bedroom Master Antique
Creating a luxurious master bedroom is all about blending comfort, elegance, and timeless design. When you add antique elements into the mix,...
Read out all
10 Luxury Master Bedroom Attic
Turning an attic into a luxurious master bedroom is an excellent way to maximize your home’s potential. Attics often come with unique...
Read out all
10 Luxury Bedroom Master Aesthetic
Creating a luxurious master bedroom is about more than just choosing expensive furniture. It is about crafting a space that embodies comfort,...
Read out all
10 Bedroom Bed Designs
Your bedroom is more than just a place to sleep—it’s a sanctuary, a personal retreat where style and comfort meet. Central to...
Read out all
10 Beige Bedroom Ideas
When it comes to bedroom design, beige is a timeless and versatile color that exudes warmth, sophistication, and calm. Unlike brighter colors...
Read out all
10 Cool Bedroom Ideas
Your bedroom is more than just a place to sleep. It is your sanctuary, your personal retreat, and a reflection of your...
Read out all